Tricky Hiragana: は, ほ, ま, も, and よ
Distinguish the characters は (ha), ほ (ho), ま (ma), も (mo), and よ (yo) with this interactive guide. This is Part 2/6 of the Tricky Hiragana series.
Another group of easily confused Hiragana characters are は (ha), ほ (ho), ま (ma), も (mo), and よ (yo).
This post is the second part of the Tricky Hiragana series. In our previous post, we discussed the Hiragana set of ki, sa, chi, and ra.
Why do they look similar?
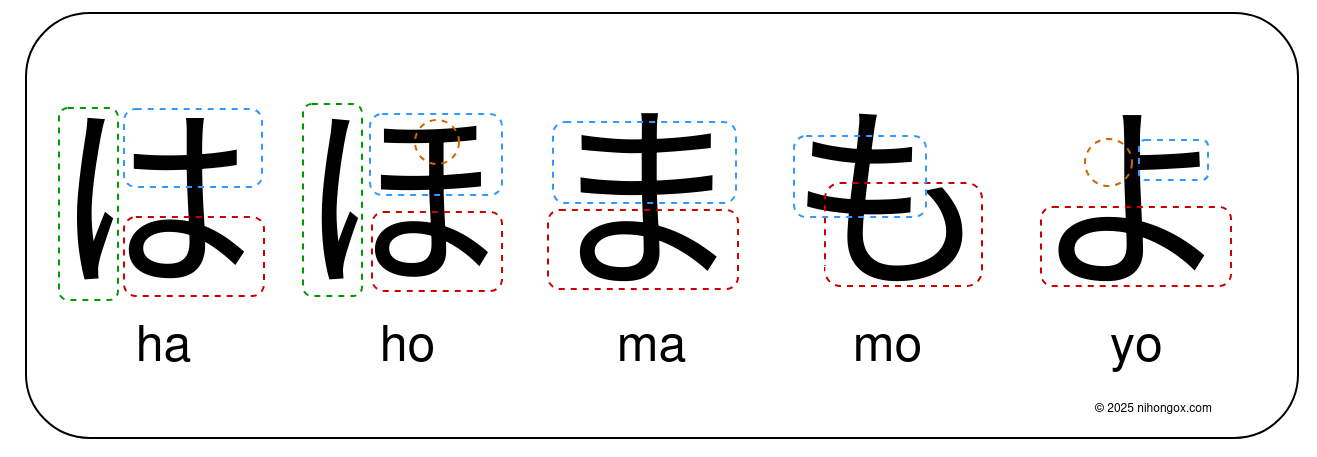
These characters can be split into two groups. The first group, は (ha) and ほ (ho), both have a distinct vertical line on the left side. The second group, ま (ma), も (mo), and よ (yo), lack this feature but share similar loop-like structures.
Refer to the green dotted lines in the image guide to see the vertical strokes in は (ha) and ほ (ho).
Let’s break down the differences.
The は (ha) and ほ (ho) Pair
At first glance, は (ha) and ほ (ho) look nearly identical. They both have vertical lines one the left. The trick is to count the horizontal lines on the top right side and check how the other vertical line on the right with the loop at the bottom crosses them.
The character は (ha) has only one horizontal line. The vertical stroke crosses through the horizontal line, forming a shape that resembles a cross or the letter “t”. In contrast, the character ほ (ho) has two horizontal lines. The vertical stroke starts at the top horizontal line and does not cross it.
は (ha) has only one horizontal stroke.
ほ (ho) has two horizontal strokes.
Make sure when writing ほ (ho), the vertical line on the right does not cross the top horizontal line. I remember my sensei would mark that part if I made the vertical stroke exceed the top horizontal line. See the orange circle dotted line in ほ in the image guide
Quick Practice - は and ほ
Flip the cards below and test your understanding.
The ま (ma), も (mo), and よ (yo) Group
This group is tricky because they all have a rounded or hooked shape at the bottom. The main difference lies in the number of top horizontal lines and the shape of the bottom stroke.
Refer also to the blue dotted lines in the image guide to see how the horizontal strokes differ.
ま (ma): This character has two, often slightly longer, horizontal lines at the top. Unlike ほ (ho), the vertical stroke crosses through both of these horizontal lines. The bottom part is a full, closed loop that finishes by stroking downwards and to the right.
も (mo): Like ま (ma), this character starts with two horizontal strokes although these horizontals are slightly shorter than ま (ma)’s horizontals. However, its bottom section is not a loop. It’s more of a large, open C-shaped hook that sweeps upwards.
Refer to the red dotted lines in the image guide to see how the loops and hooks differ in each character.
- よ (yo): This character has only one short horizontal line at the top that looks like a half-stroke. The vertical line does not even cross this line. Instead it touches it at its leftmost point before dropping down to form the bottom loop. The bottom part is a closed loop, similar to ま (ma).
ま (ma), も (mo), and よ (yo) do not have that straight vertical line on the left.
ま (ma) forms a bottom loop. も (mo) froms a bottom hook.
よ (yo)’s horizontal line is half and touches only the vertical but not crossing it. See also the orange dotted line in the image guide.
Quick Practice - ま, も, and よ
Flip the cards below and test your understanding.
Further Resources for Your Hiragana Practice
You can review the entire H, M, and Y Hiragana sets with basic sample words and emojis using the following flash card sets:
- Hiragana H Set - Practice the full ha, hi, fu, he, ho from this guide.
- Hiragana M Set - Review the ma, mi, mu, me, mo set.
- Hiragana Y Set - Try the ya, yu, yo to set.
Try also all the five tricky Hiragana characters we discussed in one flash card deck at Tricky Hiragana: は, ほ, ま, も, and よ.